e-ky-nor-lacks
Introduction
I believe deep down we all want to be the best "us" we can be and do the best we can do. If things are worth doing at all, they are worth doing well. Those of us who stream, stream to be seen and to be heard, in many meanings of these words. But sometimes, for everybody of us, there just comes the day, when we could swear the technology is out to get us. Gremlins are busy. Murphy has a field day. We're not being seen or heard, literally. Something has gone wrong. This tutorial is about how to try our best ensuring it does not happen and if it happens, noticing it and fixing it before our viewers have a chance to.
But if nothing is broken and sound is coming through, does that mean we're A-Ok in sound department? No, as is passing grade not a highest grade. Our job as sound producers has barely started. Producing the highest quality we can is a factor to accessibility of our stream and it's not just a buzzword I like to throw around. People matter. “It's what closed captions are for” you could say – but remember two things. If you're here, reading this amateur tutorial, then you're probably an amateur streamer on a budget. You're not hiring a stenotypist to create your CC live and computer generated captions, while getting better with every year, are sometimes hit and miss – yet to be generated properly, the captioning program requires good, audible, easily understandable speech. And the second thing is, very roughly speaking, for one deaf person out there in the world there are ten with partial hearing loss. You will probably join this group in distant future too, dear reader, as it is almost unavoidable with old age, only the amount and type of hearing loss is variable here. Most members of this group do not want you to start learning sign language – they want you to speak loud and clear – but to be honest, the rest of the audience does too. Respect their time. Respect yourself and your players. Produce the best thing you can.
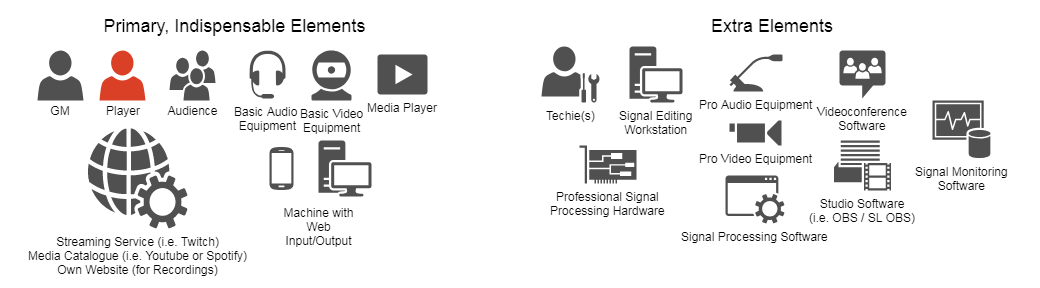
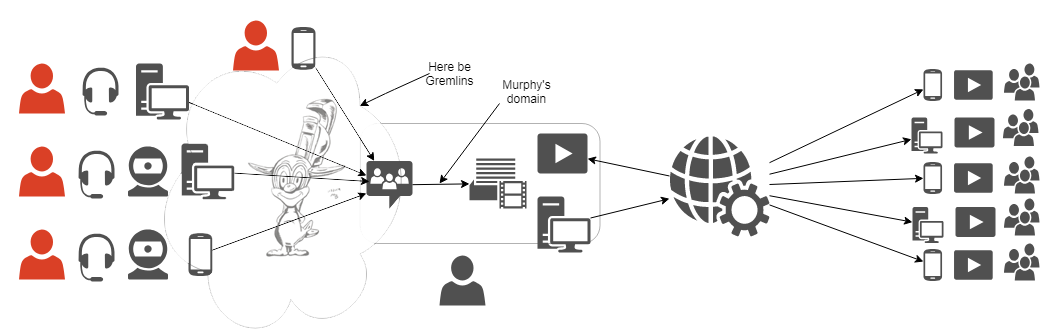
Let's define the area we'll be working on first. There are many ways to classify actual play TTRPG streams and recordings – that is actually one of the classifications, live vs prerecorded. We could divide them according to the budget – pros vs amateurs (but it's more linear than that). We could divide them according to the type of signal – audio + video vs audio. Finally we could divide them by topology of things – the arrangement in which all elements of the system (I would list them as meatware + software + hardware :P ) are connected to each other. Lets focus a bit on the last one, because that is where all the challenges and problems a streamer can solve are coming from. Everything else is more or less constant. Live vs prerecorded – it's a decision made way before a game is organized. Audio-only vs video – same, though budget can impact this decision. Budget – well, it does change, some of us are even streaming with improving the budget as a goal – but for any given moment it is what it is. We do with what we have, we do without if we don't. Meatware, hardware and software are the only areas a streamer can act and has to act – and the only areas that act out on their own. Here be gremlins.
The meatware is not my area of expertise. You might tell by me calling fellow humans “meatware element of the system”. In computer technology it's always the weakest link (why hack the super secure server, if you can phone some poor desk jockey, convince him you're their boss and force them to spell you the password?) - but TTRPGs lore concerning players is an ocean full of stories of players we had. Of GMs we had. Of things they've done and things they haven't done. Fun stories, sad stories, cringy stories, heartwarming stories. Stories of glory and stories of defeat. The “meatware as element of TTRPG system” is best described by this done to death meme:

And we can't do a thing about it.
The hardware is usually most constrained by the budget, but whatever you have, you still have a lot of room to maneuver in. Sometimes literally, as positioning things in the room is crucial for many elements. Also, there are some things that can be done dirt cheap and improve both your and your audience's experience – but this part will not be about hardware. I might write something about it some day – but for now, let's assume hardware is a constant too. This tutorial will be about software.
Let's get back to this topology thing, the underlying structure of our streams. Generally it's a network build of following elements:
The most basic setup allowing to stream a TTRPG game (or record a podcast if you remove the camera) would be something like this:
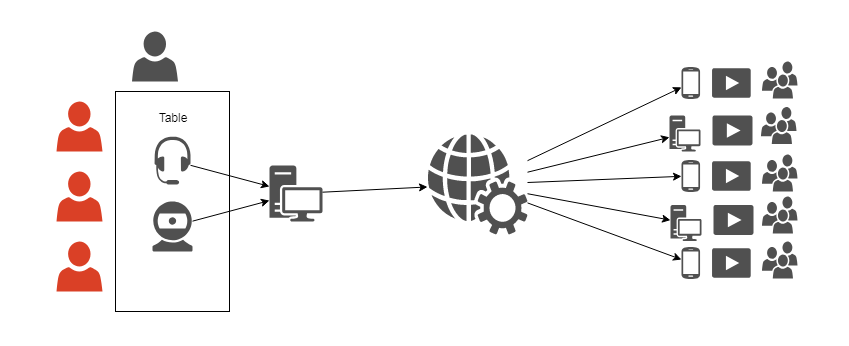
It does not even require any Broadcasting Studio software – basic Twitch phone app or phone audio recorder will do. But, if we were to invest some serious money, it could look like this:
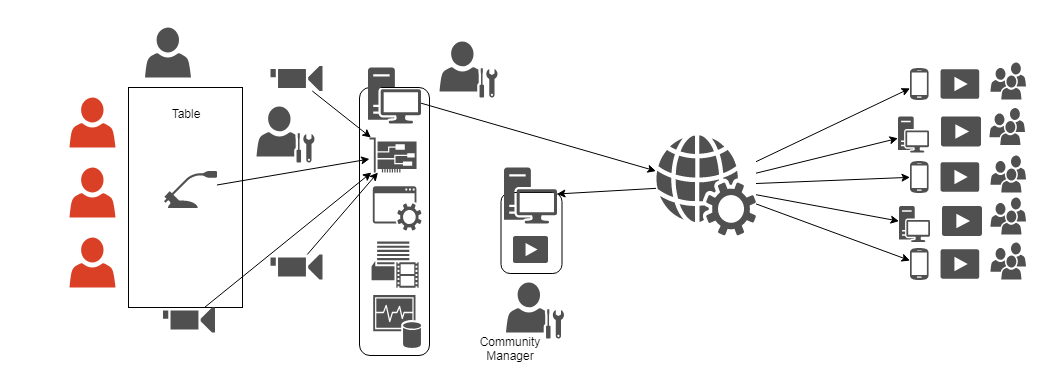
This what we would call professional streaming gig. Or TV studio – of course with many more equipment “nodes” and people working on them. There's really little difference between producing for example an episode of a talk show and an episode of your campaign, if you were to play it in TV studio, obviously. So, it's the highest tier. But is it a most complex setup? In my opinion, no. By gathering all participants in one place, using solid cables and having one tested, well synced set of equipment, the area the gremlins can strike in is severely reduced. Staying in realm of producing TV program, those who remember times before cell phones and digital transmission certainly remember also how often news broadcasters failed to connect with their onsite reporters, or something was wrong with that connection. Why? Well, because usually someone forgot to do something, but that's is a natural consequence of adding many new points of possible failure to the system. And this is a system with many possible failure points – yet it's also the reality of streaming a game played by videoconference:
Gremlin by BlackSnowComic@Twitter
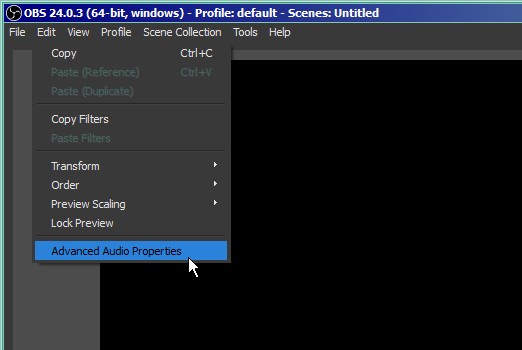
So, we have a variety of hardware in variety of places connected with not always reliable internet. It's the gremlins' playground, but since it partially coincides with meatware, it's not in the scope of this tutorial. It focuses on what the streamer can do on their own, namely, two things. Making sure what the things we gather and send to OBS are exactly what we want them to be is first one and the second one is even more important. It's making sure the OBS outputss signal we want it to. And it requires adding two blocks into the streaming station:
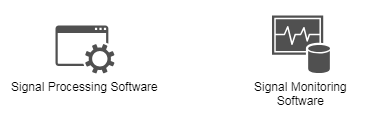
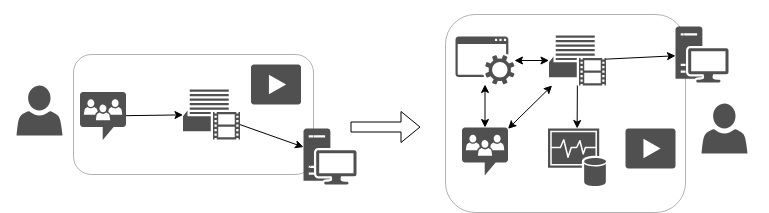
Making sure the OBS produces correct output
What we're trying to improve here
I've written earlier, that between OBS input and output, making sure the output is correct is more important. It might seem counter-intuitive, if we don't feed the program right data, how could we expect right results? We don't, but the thing is, if we feed it right data, we still can't be sure the result is good. And it's about making sure. If the output is right, the data is right too. If the output is wrong, we usually learn what part of input data needs to be fixed. But let's confront it with reality of streaming. There's a reason I put “media player” and arrow back from Twitch on the diagram. Playing your own stream back from Twitch is the easiest way to verify some things and we can be sure it's exactly what the audience gets. There are two problems with this approach: first, you know nothing until you start and in the perfect world we would prefer to have all problems solved before we start, second, it can only confirm whether video is good. Why it can't help with audio? Because you have to mute your stream or it gets played back into the OBS! The audience input on chat is your only way of learning about any problems with sound. You might ask “what about videoconference”. Well, of course, if you can't hear your players then you know something's wrong, but the fact you can hear them, doesn't really mean anything. It's actually sometimes misleading, and if audience is not forthcoming, you can play big part of your session not knowing 4/5th of your virtual table is not coming through to the OBS. It's something I've seen myself and it's what partly motivated me to create this tutorial, but it was a typical case of SNAFU. Things don't go that broken too often. What happens way more often is some trouble in Murphy's domain, the volume. Videoconference only verifies if you hear other players and with some feedback from them, if they can hear you – but there is no way for you to hear yourself in relation to the players. Mismatched volumes is innate fault of this kind of setup because the audience is first point on the diagram you and your players are heard together. It might sound minor, but the mismatch often reaches the range of unaudibly quiet vs booming so loud it hurts – and if it crosses the clipping range it's so loud it's distorted.
Quick note on clipping
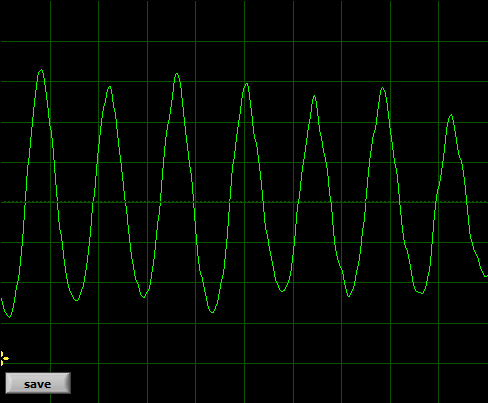
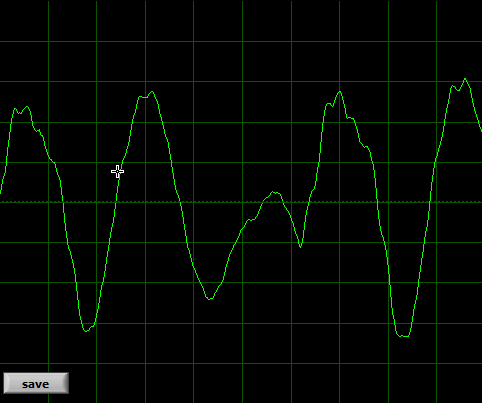
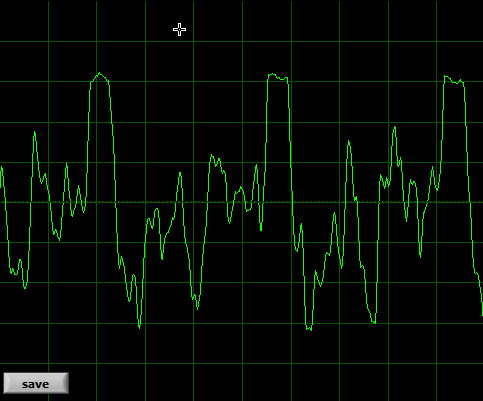
(...and why too loud is sometimes even worse than too quiet): without going too deep into the science of things, these 6 pictures show the problem with enough clarity to prove the truth of “one picture is worth 1000 words”.
This is good quality male TTRPG streamer:
This is poor quality TTRPG stream with lot of noise:
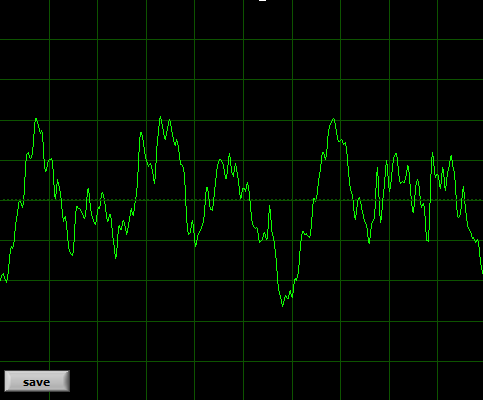
This is poor recording of death metal band
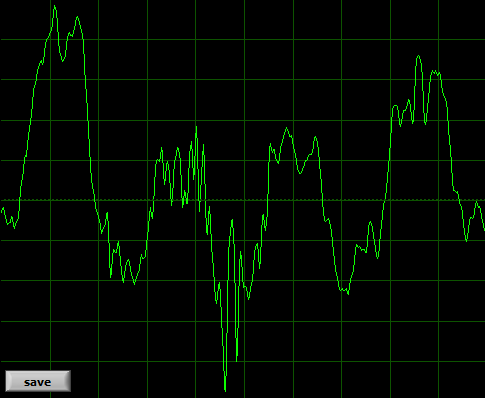
This is a streamer overdriven in OBS (too loud)
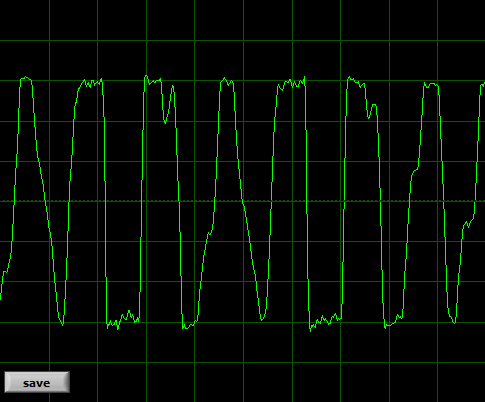
As you can see, human voice is a pretty stable, smooth wave when it comes to vowels. It would be harder to represent consonants this way – but the rule is the same. The shape of the wave represents the sound. If the general shape gets distorted, the sound gets distorted. If the line gets “fuzzy” or jagged, that's usually some alteration or noise (or background, music included). The “main” sound is not distorted, but it might get a little masked by something else. That is very strong simplification.
How clipping occurs:
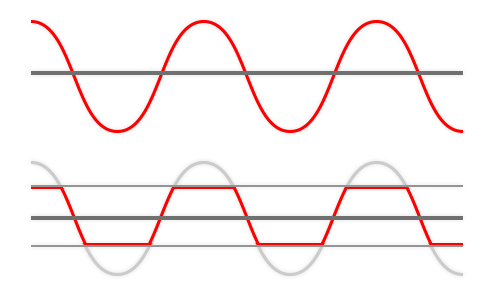
Imagine the opera singer serenading you via videoconferencing software. Whatever is their signal range and your playback settings, lets assume the total is 80% of the entire range. If between videoconference and audience signal gets boosted by 50% (for example in your OBS) you can imagine how the first oscilloscope reading gets “clipped” into last, right? 80% gets stretched into 120% and whatever falls into -120-100 and 100-120% areas gets flattened at 100%, the tips of the waves get clipped. They are not clipped flat, because it's practice, not theory, but you can see the more or less horizontal "rip". I tried to find youtube recording to direct you to, one demonstrating how clipping distorts human voice, but all the “how to fix this bad clipping” tutorials dealt with minor distortions we would not even shrug about. Wimps. So let's just stick with too loud = bad.
Our tools and why we need them – downloading the software
Fortunately, you can catch this easily with output signal monitoring. What's that about? First, we assume that Twitch does not mess with our signal a lot. Whatever technical problems they have are usually all about network. Stream might not come through their servers, but if it does, it won't be altered. Whatever sound reaches the audience, it is the same thing that comes out of your OBS – so if you are checking what's coming out of your OBS, you know it's what reaches the audience. But how exactly one monitors such output? Play it on your headphones? No, that would come back onto the audio track of the stream same as unmuted stream playback. You need to send it somewhere it won't make a sound – the display. You need to visualize the sound.
There are two software components necessary here. Something to create a dead end for sound (an arrow on the diagram)and something to visualize it (a node on the diagram). First thing is called virtual audio device. I recommend VB-Audio's Audio Cable:
Project's page
Direct link to driver download (Windows)
It's safe, I've been using it for years, it is (with other works of this author) recommended not only by me and it's donationware. Which means, as long as your budget is empty, it's free. If you find it helpful, especially if it helps you earn some money, donate its author some indirect fruits of his labor back. To be honest, this tutorial is not about recommending you the software - because I think this particular piece you will find recommended almost everywhere – it's about convincing you to use it and showing you how, so you can't go with “I don't know how” and “it's too much work”. It isn't. :) If some of you find this tutorial too detailed – sorry, I'm just trying to make sure no possible snag is left uncovered.
For second one, any kind of visual spectrum analyzer would do, but for consistency we'll go with VB-Audio's Spectralissime. Same quality assurance, same distribution model:
Program's website
Direct download (Windows XP / 7 / 8 / 10)
Installing VBAC and Spectralissime
Installing the virtual audio driver comes with several more steps and instructions than the other one:
1) Unpack the archive.
2) Launch VBCABLE_Setup.exe or VBCABLE_Setup_x64.exe (for 32bit Windows and 64bit Windows respectively). Remember to do it in ADMINISTRATOR mode, if you're not running it as your default Windows User account.
3) Installation is pretty straightforward. Won't be long, but might freeze computer for few seconds.
4) Reboot computer. As this program fools your computer into thinking you've installed new physical sound device, this is necessary.
For Spectralissime, it is as straightforward as it gets. Launch the downloaded file and it will be done momentarily. The only complication is the installer does not create shortcut on the desktop, you'll need to launch the program from the Start Menu. Or create the shortcut yourself.
Configuring OBS / SL OBS (for output monitoring)
With both programs you need to do exactly same things, the only difference is where the options are located, so I'll cover both of them at once. Ofc, do it after installing virtual cable and rebooting computer. I also assume you have done all other things with OBS you wanted to – that you streamed with it before. It's only about how to add output monitor.
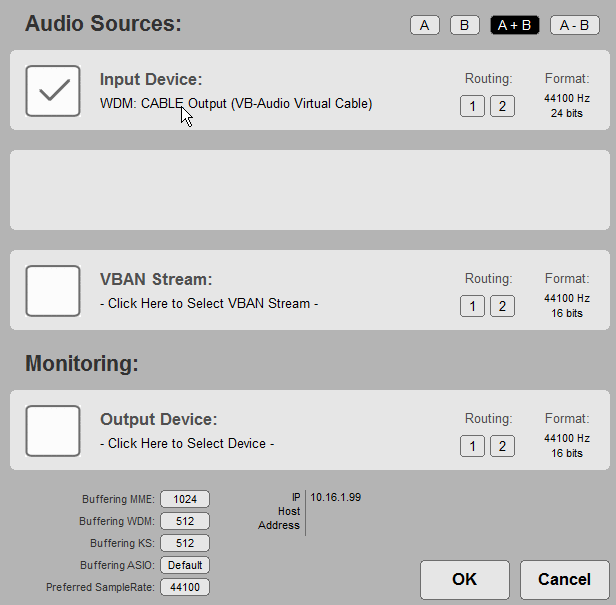
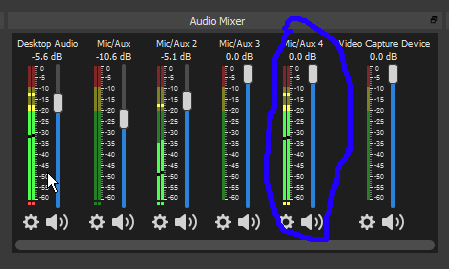
First, we need to set monitoring device - send the signal to the "pipe's entrance" - Virtual Cable Input.
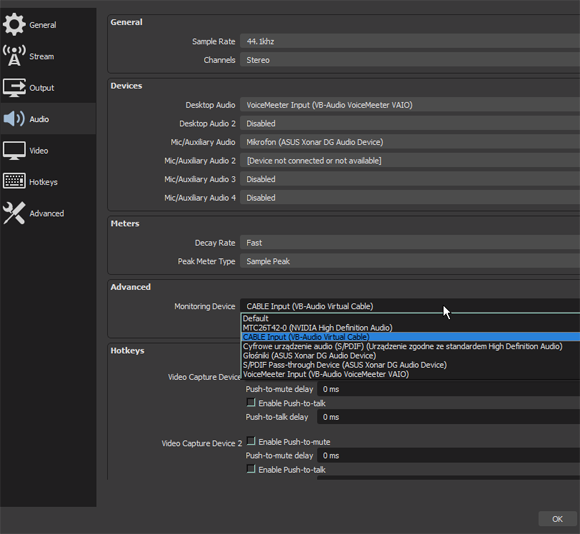
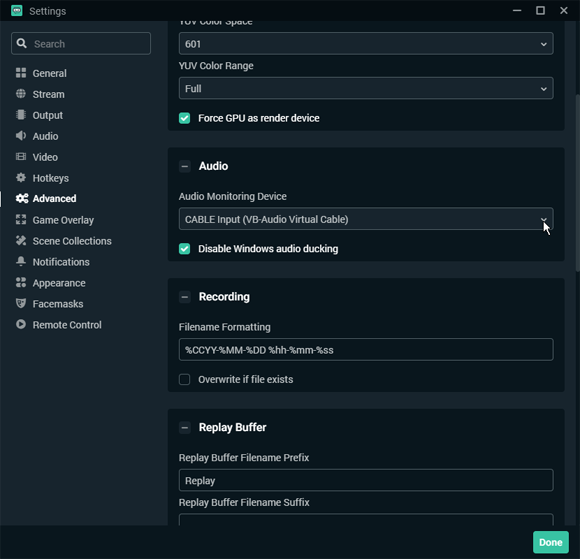
Disabling Windows ducking is recommended.
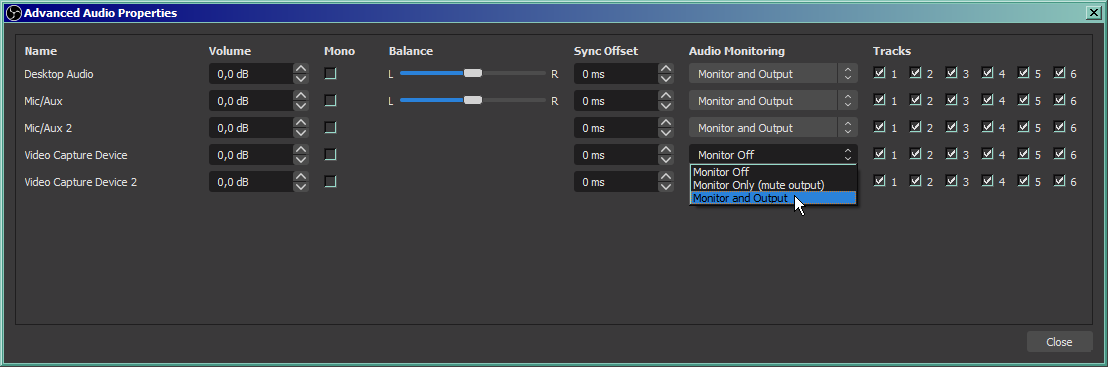
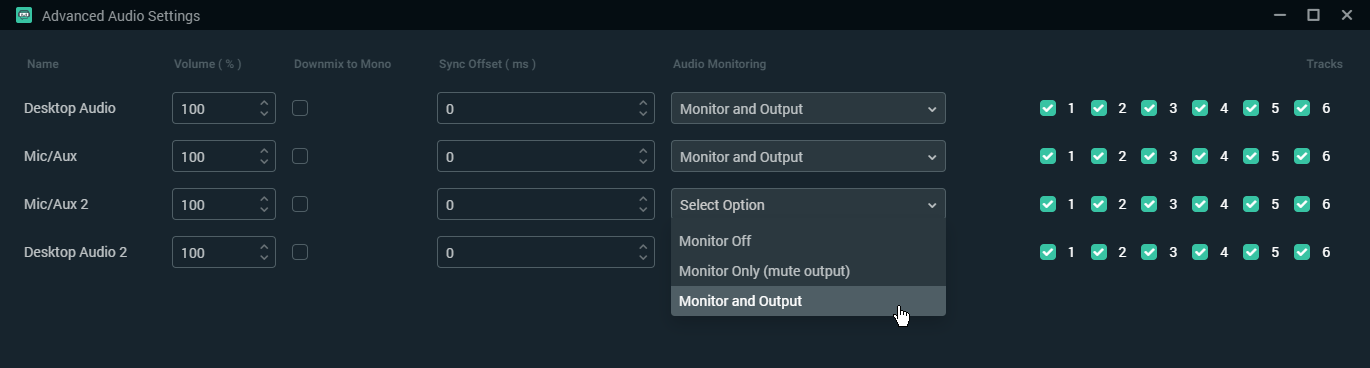
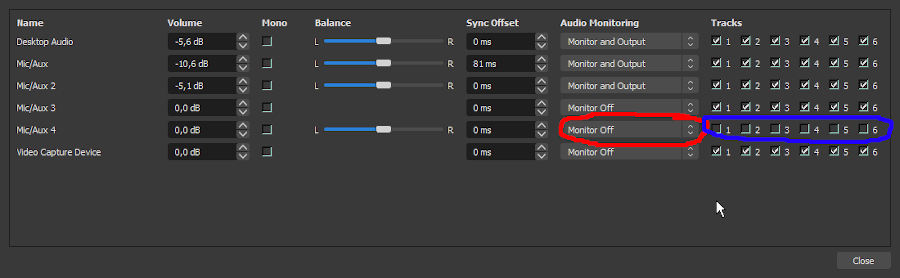
Next we need to go there, to pick the OBS tracks we want to monitor:
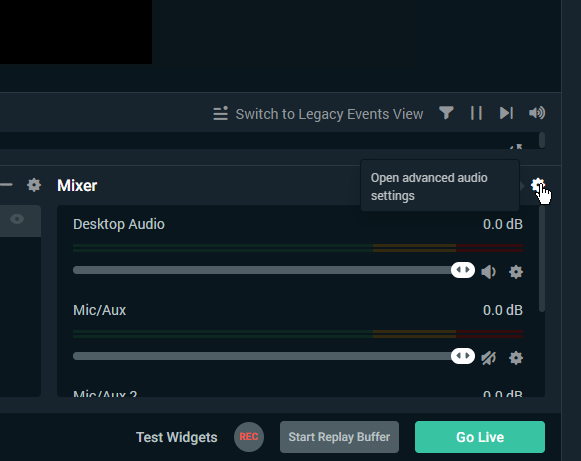
We want to monitor either all tracks you use, or just literally all tracks. Checking them for assumed zero output won't hurt. Set them to "Monitor and Output" - these three options are literally a choice between arrows outgoing from OBS on our diagram - output is Twitch, monitor is our analyzer, we want both. As I wrote earlier, I assume that you streamed with it before, so all scenes / devices / tracks you need are already listed. If you add some new devices/tracks, remember to return to this submenu to turn on monitoring on them:
Configuring Spectralissime
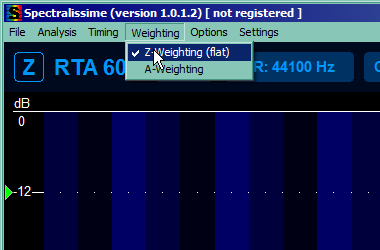
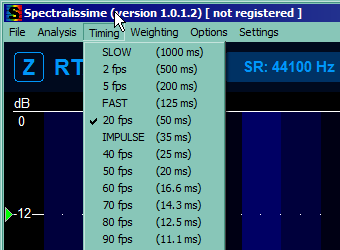
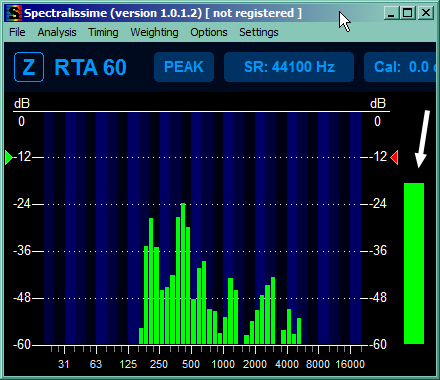
Well, the program is a spectrum analyzer. It measures the magnitude of an input signal across given frequency range - hearing range in our case. To put it simply, how loud each frequency band is. For now we'll be interested only in general magnitude across the entire band, and we'll configure the program to bother us and our computer the least. This will lower the "resolution", keep the math simpler, and make sure the bars "hang" long enough for us to notice them, but move fluid enough not the weird us out.
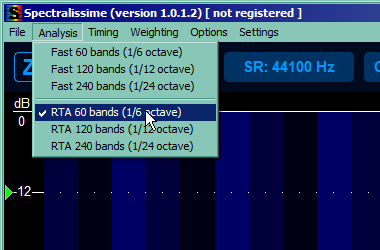
This part takes care of reducing our viewport so we're not bothered by signals too quiet to hear them anyway and by other things (and to make sure you have same units as tutorial). So mark the 4 things you can see on the picture below, unmark the rest of the marked ones and reduce the range to top 60 dB.

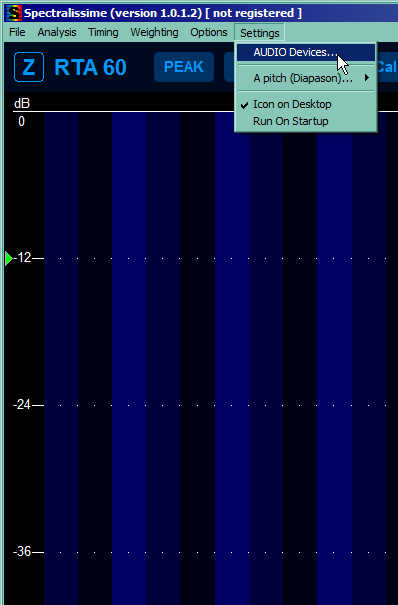
Time for most important part, setting the Audio Device the program will analyze (and you can take care of missing dekstop shortcut if you want). Pick the Virtual cable Output - it's a cable, it has two ends, one will go here, the other we stuck into OBS secondary output, right? One thing that is pretty unintuitive is choosing the device - click the name and pick one from the list that might seem surprisingly long. You should pick WDM one for pretty complicated hardware reasons, but MME will also work. We will also add left and right audio channel together to keep track of both of them - pick A + B:
You can also make the window as small as possible, so you can keep it in some corner of the screen. This is the smallest it can get. Arrow marks our total output volume bar, the one thing we'll take care about (for now).
How to actually use this in practice
The real sound tweaking tutorial will be in parts concerning input and processing, but lets find some use for output monitor for now, so we can use this fancy shiny toy to actually improve something.The most important thing about this setup is it works as soon as you start videoconference, OBS and Spectralissime. You don't need to start streaming. You can tweak things with your players until you're satisfied with what you're seeing. Start with your default volume settings for videoconference loudness and OBS sources volume. Ask your players to say something. I assume you can hear them, of course, because if not, fix that first, whether it's on your side or not. If you can't hear them, OBS can't either most probably. Now, there are too many variables, to be honest. There are their individual microphone settings, their input gains, their videoconference input settings, your general playback volume, your individual playback volume for participants if your videoconferencing software allows that. As you can see, half of the variables is on your players' side, kind of makes sense, doesn't it? You can't play this game alone, neither can they. If they are all too loud or too quiet, then probably it's your problem indeed, but if they differ a lot, they need to help you. Work together, make it so you can hear everyone more or less the same – and let me stress it out once again: that includes lowering their input volume or microphone sensitivity too if necessary. Too loud is sometimes even worse problem than too quiet. This tutorial won't help for now with fixing things on their end, input section will come later.
But if you can hear every single one of them, clear and loud (but not too loud), focus on the spectral analyzer. Ask them to say few words each in their normal voice and watch the total output volume bar on the right. There are 5 ranges of interest, 0 to -12, -12 to -24, -24 to -36, -36 to -48 and below -48. Now, does OBS hear them too? Are the bars jumping merrily up and down? If not, check your OBS settings, you probably muted something you shouldn't have. If you hear them well, but the total bar on the right does not cross -36, increase input volume in OBS. Your target is all or majority of your players constantly peaking at between -6 and -24, that's the best. If you heard them all well, everyone should fall within this range – but take a look at detailed band bars on the left - if someone is still going into red a lot there, ask the culprits again to lower mic sensibility, or move the microphone away or whatever. If they peak in the red only once every few seconds, especially when laughing, leave them be. You're done with herding your cats.
Time to add yourself in the mix. Are you also peaking at -12 to -24? If you go into red, decrease your microphone volume in OBS. If you don't reach -24, increase it. If that did not help, increase your microphone sensitivity in general OS settings. Your voice will make probably half or more of the stream audiotrack. You have to make sure you will be heard clearly and you have only the analyzer to confirm it.
Ask players for few seconds of silence. You will be probably still seeing some green on spectral analyzer. That's ok. Your mic gets a lot of noise, you may be still getting players' noise too. We'll take care about this in other part of tutorial. This is your window to test your music background if you do such a thing. Play it - of course, the main point is to see if it's there. It might seem insignificantly higher than noise levels, but if you noticed it above noise, it's enough. If it varies in volume (a good background shouldn't, but maybe you're using it as illustration or SFX), play the louder parts too - if crosses -36 at any point ( we're still talking the total bar on the right), it might be too loud as a background for players to talk over. Lower the volume if it does. Of course, if you intend to use it as illustrative for players to listen to, that does not apply. Aim at -12 - -24 then.
We operate on the assumption whatever comes out of OBS, reaches the audience. So if you're there, players are there, music is there, nobody is too loud, you're good to go! You can press the start streaming button. Have a good game. You can (and I think you should) leave the Spectralissime on. We've configured it for low resource usage and its presence might save you if you accidentally mute something. Especially when coming back after a break, when you're muting things on purpose. Welcome everybody back while checking if the bar lands where it should. But take a peek every once in a while too. Can't hurt.
2.8 Simpler alternative for daily use: looping sound back to OBS/SLOBS
The most important thing OBS and SLOBS do, we rarely appreciate enough is cloning the output sound. There are many reasons to appreciate this – we can do many things with this “side” output, not only monitor how thing are going. And why the verb “appreciate”? You'll remember this paragraph next time you want for example caption your mic output, or record it, and whatever software you use for that it hogs the device, blocking others from using it (OBS for example). Together with flexibility offered by VBAC, you can redirect this virtual device carrying your sound anywhere you want… so why not back into OBS/SLOBS? What for you might ask and it is fair question. Let me answer it then. Every person who did some streaming knows how many small things have to be launched in the background for everything to look nice. Streamlabs, chatbots, virtual streamdecks if you can't afford real thing, actually I probably don't even know the half of it, never being big on adding virtual bling to the stream. Hardware resources are not limitless though. With so many things that have to work in the background you won't to shut down every single thing that does not have to, especially if you're streaming a computer game. So, if you have your sound just the way you wanted it, you don't need fancy monitor like Spectrallisime anymore. The minutiae of configuration won't change on their own, the most probable problem you might face in daily operation is you forgetting to turn something on – which usually results in no sound at all, so all you need to check for that is some light blinking when you make sounds. OBS has plenty of those – and is a thing you will have running anyway. The less software in the background, the better. So, how to do it?
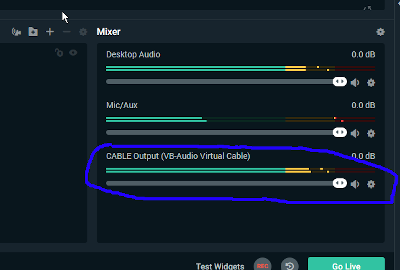
Whoever named the virtual audio device “CABLE” was some sort of damn genius. It's literally what this device does most of the time. You plug one end into the OBS output “port” (this end of the “cable” called VBAC input) and the other into signal monitor input “port” (that being VBAC output). This time we plug the “cable output” back into OBS as input device.
First, add the device:
Second, make sure of two things:
Make sure the device you add IS NOT MONITORED. It takes several milliseconds for the signal to loop back to OBS. If you put it again into the monitor with this delay, and then it comes back again with the same delay… you don't want to do this. Really. I can't really describe the result, but YOU DON'T WANT TO GET IT. I used all caps, repeated it several times… now I feel safe in saying I bear no responsibility if you have this device monitored after all.
And make sure the device is no part of your tracks. It's again about delay – if you send this device to stream, or make it part of your recording, you will have echo. This time only a single repetition, not deafening endless loopy echo growing in strength like in previous case, so no big letters. Still, echo is also something you probably do not want.

Enjoy your blinking lights! I remind you, it's not lights for lights sake: it's so you see the bar closing to yellow when everybody talks (the missing signal being usually either you, or all of the players). Or music or game, whatever you do stream.
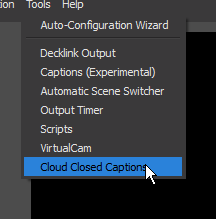
3. Adding closed captions.
3.1 Few words on possible options.
Like I stated in introduction, there's a point to maintaining the highest quality of sound possible: it's the accessibility. Adding closed captioning to your stream is logical choice for next step. There are many solutions for that, but as earlier, when I described the possible topology of sound hardware, the wallet is your usual limiting factor. The only really proper solution for closed captioning is hiring the stenocaptioner. They're experienced stenotypists, who write what you speak (with very little delay) on stenotype machine, connected to the computer that formats it properly and sends a sort of text stream to streaming platform. If there's any AI solution capable of reproducing that sort of quality, it must be so expensive, I haven't even heard of it – but knowing how humans subconsciously use context to fill for the things they misheard initially, I feel safe assuming such a solution does not exist and won't exist until we have context-sensitive, “true” Artificial Intelligence capable of understanding things like humans do.
So, for solutions that are easy on our wallets, there are several AI speech-to-text transcribers working in real time, with usual caveat of “good money gets you good stuff”. In our favorite price bracket of “for free”, there's only real contender: Google Cloud solution. Considering the amount of work Google has done to make their Assistant for Android smartphones usable (as in, doing what we tell it to). the amount of audio data it has access too to learn on (all the Android phone users) it comes as no surprise they offer the best results. Frankly, they are so far ahead of the competition, I would be a bit surprised you still can use it for free on desktop computers… if not for the fact they want it available for every user of all of the Google Services. I suppose if you want everybody to use your software, you have to make it possible for everybody to use it. Of course, ways of accessing it without actually using one of the aforementioned services are very limited, but there are some possibilities.
So, we picked the best AI to transcribe our speech – but there are other factors to accessibility. Closed captions have to be legible for them to work. Here is where choices stop being easy, unfortunately. If you are a gaming streamer, you do “just chatting” stuff, stream some hobbies, thing that stays constant (usually) is that you're the only one to do speaking. It's not true for TTRPGs. Everybody who played any game at least once, knows the table can be a pinnacle of audio chaos at times. People shout over each other, there is laughing, off the cuff commentaries – and I don't mean in any kind of bad way. It's people having fun, it's what the games are supposed to be. There is literally no way to convert the table banter into subtitles. And the hard of hearing people who usually follow the speech pretty well if it is loud and clear enough, won't get this banter either. If you stream your games just casually, I mean, it's a game first, and the stream is just an addition, it's fair to say “let AI do what it can, something is better than nothing”. I get it you play for your fun first and foremost. But if you are making a stream, a show where you play the games, you owe some degree of quality to your audience for their time. I won't force accessibility down your throat – it has to be your choice – but if you want to have it, you have to follow it with actions. Cut a bit on the banter. Make people respect each other turns. Have fun, but let hard of hearing folk have fun too. As I said before, 90% of them won't even need closed captions then. If everybody speaks clearly, the sound is clear, people are not talking over each other, you already do a good work on the accessibility. Captions are just cherry on top of this work.
But it is never possible to avoid any and all banter. AI won't work with compound audio source in those moments – it literally has no way to separate the speakers. You can separate the speakers though yourself – you can have captioning AI working on each players computer, with each player sending you a result text stream and you can put every player's text into separate box. It sounds great, but it is not without faults. The most important one being making it hard on the people you make the captions for. Reading several things at once, that appear, move, disappear, each in their own pace, is not what our brains are built to do. Separate boxes are less legible than one shared box. The other problem is you have to set it up on players' computers. I named this topological space the gremlin zone for good reason (see @ the end of Introduction). I am not saying your players are incompetent – but you really can't control what's going on on their computers.
As for the single box solution, well, it can be all done really easy just on the streamer's hardware, using the group call audio output and your mic… but AI will be a bit confused by different volumes, timbres, rhythm, speech patterns. Make sure everybody is audible as best as you can. And for the banter… well, RIP AI. Press F to pay respects. The content will be garbled at best, at most cases AI will fail to produce any sentence at all, assuming it's some background noise with chatty people. Is that better than multi box screen chaos? It's not for me to decide. From what the feedback I got from hard of hearing people, it's still the preferred solution though. Some are very adamant about it, some are aware of the AI loosing track of the speech, but they would had trouble reading multiple boxes anyway, so the bantery parts are unacessible either way. So, I will recommend the single box solution… but ultimately you make the choice yourself.
3.2 Adding multiple boxes with help of Webcaptioner.
The tutorial for multiple box solution would be a copy of the well known tutorial at https://sites.google.com/view/rpg-unltd/home I have nothing more to add on this subject, they have covered all the bases and I won't be denying due credit to folks who did this one. Figuring this all out, fighting hordes of gremlins, was hard work and they have my respect. If you want multiple boxes, use their tutorial, credit them for help, they deserve it. Nuff said.
3.3 Adding a single box...
If you decided on single box solution, unfortunately, it is where OBS and SLOBS stop being interchangeable. I don't know why the best thing available for OBS does not work under SLOBS, but there must be some limitations and valid reasons. Maybe a problem of access to SLOBS source? Ways SLOBS handles plugins? Well, whatever the reason, things don't work the same anymore. So, let's do OBS first – and if you use SLOBS, scroll down a little bit through OBS version to find the SLOBS one at the end.
3.3A ...in OBS.
The biggest problem with converting speech to text when multiple people are speaking through multiple devices is joining them together – luckily, the work is already done if you're ready to stream everybody playing the game together. OBS has already done the work for us, and if you followed tutorial for signal monitoring ( chapters 2.3 to 2.5 ), you have also cloned the signal to be able to see if everything works past the processing stage. I already mentioned how handy VBAC is here – and how you want to avoid running too much stuff on your computer. Considering the latter thing, the fact the only thing other than WebCaptioner that uses Google Cloud AI is an OBS plugin is a blessing. So follow the things I described in 2.8 to redirect the output back to OBS.
You also need to download and install the plugin from https://github.com/ratwithacompiler/OBS-captions-plugin/releases
1. Pick the .zip file appropriate for your system and software from newest release and download it.
2. Unzip the file, move its content to the OBS plugins directory – usually it is C:\Program Files (x86)\obs-studio\obs-plugins , but if you changed the default installation path, you will have to find it on your own. Notice the 32-bit and 64-bit directories in the zipped file – the obs-plugins directory follows the same structure. Make sure to put everything where it should be.
Now it's time to configure the plugin – start OBS – or restart it if it was already running, and you will see it on the plugin list.
Click it.
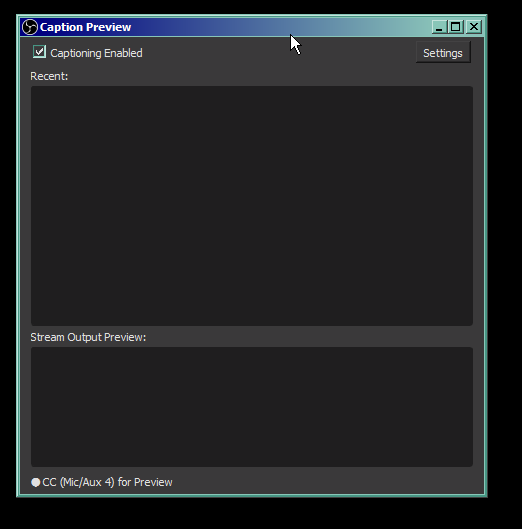
Tick the checkbox and open Settings. Now comes the tricky part.
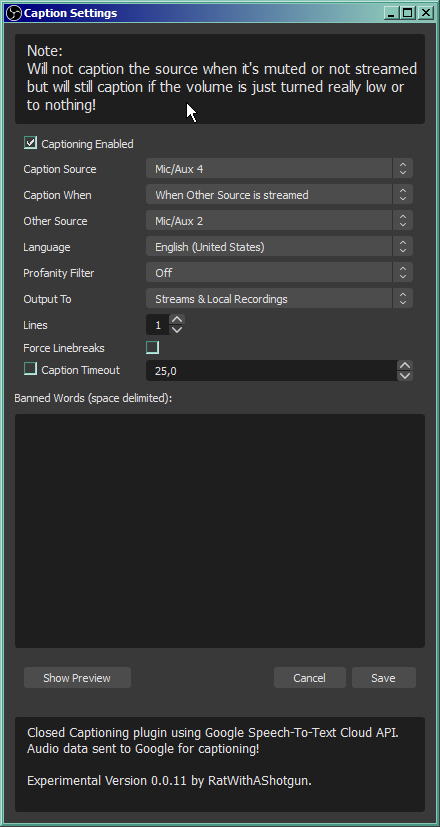
Against the intuition, you can't caption the source from any of the devices you stream. The OBS takes different sources (group call with the players from the system sound device and your microphone) and joins them together, but the sound from these devices is not joined yet – that's why we looped the VBAC back to OBS. But also you don't want to stream that device, because of what I already explained. Delays, deafening walls of echoed sound, stuff like that. So, you have to set the VBAC Cable Output as captioned source – check what's the name of this device in OBS – set the captioning to be performed when other source is streamed – and pick either your mic, or desktop audio, as the triggering device. Mic is better choice, because it will also work if you stream something else alone.
The rest of the setup is self-explanatory and concerns mostly the text layout. The best thing about it, is that this is exactly how closed captions are supposed to be delivered to streaming service. They are sent along the stream data as text, to be displayed on audience's devices as audience sees fit (or turned off). The entire setup of how the subtitles are displayed is in the Twitch client.
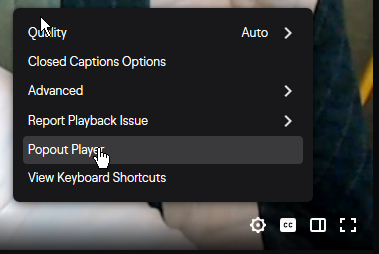
Notice the little CC button and “Closed Captions Options” in the stream settings menu. Your job ends at delivering the text to their computers, they can set it up how they see fit.
3.3B ...in SLOBS.
Frankly, the solution for SLOBS is sort of a slapped together workaround for the problem the plugin for OBS is not compatible with SLOBS. You have to use the WebCaptioner (again, I recommend excellent tutorial @ https://sites.google.com/view/rpg-unltd/home for setting it up). Use the SLOBS part of 2.3 to 2.5 but DON'T loop the VBAC back. You don't need it unless you want the simplified monitoring feature. This cloned SLOBS output will serve as compound source of all sounds for WebCaptioner to capture and work on. Remember when I said this Cable thing is handy? VBAC Cable Output is your microphone you have to choose while configuring WebCaptioner. If you did everything right, captions should be now hardcoded into your stream. I hope they are!
If you have any questions or comments, you can find me hanging on Discord as Echinorlax#9877 or on Twitter as @echinorlax